Most Twin Cities homes have one. The triangle of space under the staircase that started with good intentions and ended up holding a bin of holiday decor, two mismatched sleds, a box of things that are too useful to throw away and too inconvenient to actually use. In older homes especially, it is walled off with drywall, closed with a hollow-core door, and quietly ignored for decades — split-levels and split-entries, the kind of layout that shows up constantly in Savage's older housing stock, tend to have an especially generous version of this triangle simply because of how the stairs stack.
That space is almost always larger than it looks from the outside. And because it sits within the footprint of the home rather than adding to it, transforming it with custom cabinetry and millwork is one of the more efficient ways to add genuine function without changing the home's structure. The six ideas below range from practical to architectural, but all of them share a common outcome: a corner of the home that used to be written off becomes something people notice and use every day.
- Functional Pull-Outs — Ideas 1 and 2
- Lifestyle Conversions — Ideas 3 and 4
- Architectural Flex Spaces — Ideas 5 and 6
- Common Mistakes to Avoid
- Pre-Remodel Under-Stair Inspection Checklist
At a glance, here's how the six ideas compare:
| Idea | Estimated Budget | Install Time | Complexity |
|---|---|---|---|
| 1. Graduated mudroom drawers | $3,500–$9,000 | 1–2 weeks | Moderate |
| 2. Built-in pantry extension | $2,500–$7,000 | 1–2 weeks | Moderate |
| 3. Glass-enclosed wine display | $5,500–$16,000 | 2–3 weeks | High |
| 4. Custom pet haven | $2,500–$7,500 | 1–2 weeks | Moderate |
| 5. Built-in pocket home office | $4,000–$10,000 | 2–3 weeks | Moderate to High |
| 6. Secret kids' play nook | $6,500–$16,000 | 3–4 weeks | High |
Functional pull-outs — ideas 1 and 2
The most immediately useful under-stair projects are the ones that solve a real daily friction point. In Minnesota, that friction is often seasonal gear — boots, coats, mittens, and the general accumulation of what it takes to leave the house in February.
Idea 1: Custom graduated mudroom drawers
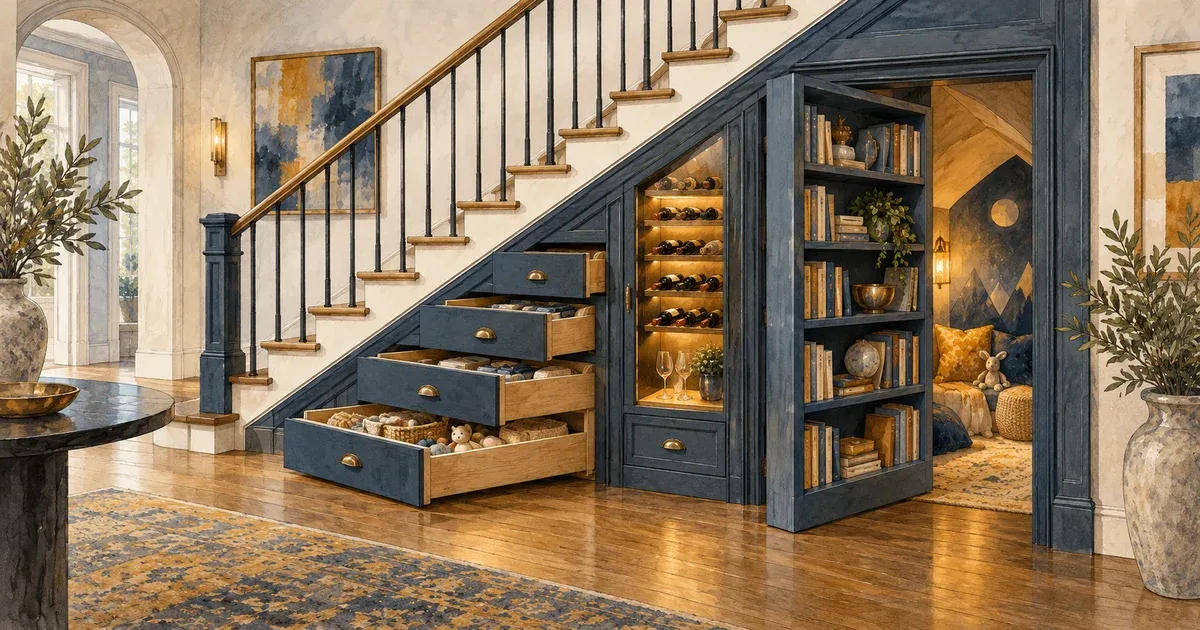
The underside of a staircase follows a slope. Rather than working against that geometry, graduated drawer systems work with it. Each drawer is sized to match the available headroom at its position along the stair run — taller drawers near the base of the staircase where clearance is greatest, shallower drawers toward the low end. The result is a full bank of pull-out storage that looks like it was always meant to be there.
For a Minnesota household, this is the most functional under-stair application available. Deep lower drawers accommodate boots, helmets, and winter duffel bags. Shallower upper pulls hold gloves, hats, and small accessories. A hanging rod on the taller end handles coats. The whole installation can be finished to match existing millwork, making it read as a natural extension of the entryway or mudroom rather than an afterthought.
- Estimated budget: $3,500–$9,000 depending on drawer count, hardware quality, and finish
- Typical installation time: 1–2 weeks
- Complexity: Moderate — requires custom carpentry to follow the stair slope precisely; not a stock-cabinet application
Idea 2: Built-in pantry extension
If the staircase runs adjacent to or near the kitchen, the under-stair cavity can become a seamless extension of pantry storage. Tall pull-out columns — the kind used in high-end custom kitchen cabinetry — can be fitted into the taller portion of the space, with adjustable shelving sized for dry goods, canned goods, small appliances, or paper goods. A flush-set door trimmed to match the surrounding wall makes the whole unit disappear when closed.
This is particularly effective in homes with limited kitchen square footage. The under-stair cavity effectively extends the kitchen's storage capacity without touching the kitchen itself, and the transition can be made nearly invisible with careful trim work and matched finishes.
- Estimated budget: $2,500–$7,000 depending on pull-out count, depth, and hardware
- Typical installation time: 1–2 weeks
- Complexity: Moderate — headroom and depth vary significantly by stair design; measuring carefully before design is essential
Lifestyle conversions — ideas 3 and 4
The mid-range of under-stair ambition is where the space shifts from storage to destination. These two ideas treat the area not just as a place to put things, but as a designed feature that the home is organized around.
Idea 3: Glass-enclosed wine display
The taller section near the foot of the staircase is often deep enough — 24 to 36 inches — to accommodate a proper wine installation. A glass-fronted, lit wine display built into the under-stair opening becomes a visual anchor for an entry hall, dining room, or open living space. Custom wine cubbies, stemware hanging rails, and LED strip lighting behind glass panels create something that reads more like a piece of furniture than a storage solution.
For homes where wine collection is a genuine interest rather than a decorative gesture, this installation can include a small refrigeration unit for a limited number of bottles or simply rely on the consistent temperature most interior spaces provide. Either way, the visual impact per square foot is substantial. For a sense of how this investment fits into a broader renovation budget, our kitchen remodeling cost guide covers the full picture of where built-in features land relative to total project cost.
- Estimated budget: $5,500–$16,000 depending on the extent of custom millwork, glass specification, lighting, and whether refrigeration is included
- Typical installation time: 2–3 weeks
- Complexity: High — glass work, lighting, and finished millwork require coordinated trades and careful sequencing
Idea 4: Custom pet haven
A dedicated dog space built into the staircase is one of those ideas that sounds indulgent until you see how well it works. A finished alcove with an integrated dog crate — trimmed in the same material as the surrounding woodwork, with a proper ventilated door — tucks the crate completely out of the main living space while giving the dog a space that is genuinely their own. For homes with larger dogs, the deeper portion of the under-stair run can accommodate a raised bed platform with built-in storage for food, leashes, and supplies in drawers above or to the side.
Done well, this installation is nearly invisible when the door is closed. It eliminates the visual clutter of a wire or plastic crate in the living room without removing the dog's sense of having a dedicated space.
- Estimated budget: $2,500–$7,500 depending on size, millwork detail, and whether storage is incorporated
- Typical installation time: 1–2 weeks
- Complexity: Moderate — ventilation and door sizing require attention; otherwise straightforward custom carpentry
Architectural flex spaces — ideas 5 and 6
The most ambitious under-stair projects treat the space as a room-within-a-room. These two ideas require more coordination and planning but produce results that become defining features of the home.
Idea 5: Built-in pocket home office
A compact home office built into the under-stair cavity works better than it sounds, particularly in a transitional space between the kitchen and living area. A shallow built-in desk — 20 to 24 inches deep is sufficient for a laptop or monitor — fits into the taller end of the run, with overhead shelving, a task light, and a dedicated outlet strip. When not in use, a flush-set door closes the whole thing off, leaving no visible indication that a workspace exists behind it.
This application works best when the space includes at least 6 feet of usable headroom at the desk position and is within reach of an electrical circuit. The result is a genuinely usable workspace that does not take a dedicated room away from the rest of the floor plan. For households where a full home office is not practical but a focused work spot is needed, this is one of the more effective space-saving home office solutions available within an existing footprint.
- Estimated budget: $4,000–$10,000 depending on desk depth, built-in shelving, electrical work, and door detail
- Typical installation time: 2–3 weeks
- Complexity: Moderate to High — electrical coordination required; headroom and footprint must be carefully verified before design
Idea 6: Secret kids' play nook hidden behind a bookshelf door
This is the one that gets the most reaction. The under-stair cavity is enclosed behind a full-height bookshelf that appears to be a fixed feature of the wall. A push-to-open mechanism — or a pull disguised as a decorative object — releases the bookcase, which pivots or slides to reveal a low-ceilinged nook lit with string lights or small downlights, finished in paint, and sized perfectly for children. A built-in bench, a small window if the location permits, and a few integrated shelves for books and toys complete the space.
The play nook has a natural ceiling because the staircase imposes one — and for children, that low-ceilinged enclosure is part of the appeal. For parents, the bookshelf door solves the visual problem cleanly: when closed, the nook disappears entirely. When open, it becomes the most memorable feature in the house.
- Estimated budget: $6,500–$16,000 depending on the size of the opening, complexity of the hidden door mechanism, and interior finish level
- Typical installation time: 3–4 weeks
- Complexity: High — hidden door hardware requires precision installation; the bookcase must be level, plumb, and weighted correctly for the mechanism to function reliably
If structural pillars or dead corners elsewhere in your home are presenting similar challenges, our guide to transforming structural pillars with custom cabinetry covers comparable built-in solutions for open-concept spaces.
Common mistakes to avoid
Not checking what is behind the drywall before demolition. The under-stair cavity is a common routing point for HVAC supply and return lines, electrical circuits, and in some homes plumbing runs from above. Opening the space without a preliminary inspection — and without the trades on site to confirm — can turn a straightforward carpentry project into a significant mechanical rework. Always verify before demo begins.
Ignoring structural framing within the stair assembly. The stair stringers — the diagonal structural members that carry the treads — run through the space and cannot be cut or moved. The position of the stringers determines where access openings, drawers, and doors can actually be placed. Design that ignores the stringers will not survive the framing stage.
Designing for the tall end and forgetting the low end. The head height at the tall end of the stair run — near the bottom of the staircase — may be 7 feet. At the far low end, it may be 18 inches. Projects that only capitalize on the tall portion leave significant usable volume on the floor. A well-designed installation uses the full depth of the run, with graduated or nested solutions for the lower areas.
Skipping a fire blocking assessment. Minnesota's state building code requires fire blocking at specific intervals within concealed wall and floor cavities. If the existing framing does not meet current requirements, the project will need to bring it into compliance before closing the walls. This is not a reason to avoid the project — it is a reason to discuss it with your contractor before finalizing the scope.
Pre-remodel under-stair inspection checklist
Walk through these items before your design consultation:
- Headroom: Measure the clear height at the tall end (near the base of the stair) and at 2-foot intervals moving toward the low end
- Depth: Measure the depth of the cavity from the back of the drywall to the face of the opening — this determines which ideas are feasible
- Electrical: Note the location of any panel, circuit, outlet, or switch in or near the space
- Plumbing: Check whether any water supply, drain, or vent lines run through or adjacent to the cavity — common when a bathroom sits above the staircase
- HVAC: Look for supply or return registers in or near the under-stair area; note duct routing if visible
- Stringer location: Identify the position of the diagonal stair stringers — these are non-negotiable fixed elements that affect where openings can be placed
- Existing access: Note whether there is already a door or opening, and if so, which direction it swings
- Subfloor condition: Check whether the floor inside the cavity is at the same level as the surrounding finished floor — a difference here affects how drawers and built-ins land
- Adjacent walls: Confirm whether any surrounding walls are exterior walls — this affects insulation requirements and moisture management
If you want a broader sense of the range homeowners are building, Houzz's roundup of under-stair storage projects is a good next stop. Most of these six ideas can coexist in the same staircase if the run is long enough. A graduated drawer bank at the low end, a built-in pantry or wine display in the tall middle section, and a flush-set home office door near the base is a combination that solves three different problems in one coordinated installation.
The key is designing the whole space at once rather than solving one problem and leaving the rest for later. An experienced remodeling team can assess the full run, identify what is realistically buildable within your specific stair geometry, and coordinate the trades that need to be involved before the finish work begins. That kind of upfront planning is what separates a clean, seamless installation from one that shows its decisions.